The Garlic That Almost Wasn't

Thursday, November 8, 2012

2013 Bird Garlic Crop
The picture to your immediate right will indeed confirm that the 2013 garlic crop is indeed planted in the Bird Back 40! Not just planted -- but literally jumping out of raised beds that dot our crazy little cul-de-sac corner dedicated to all things vegetable and fruit. 

So what's the big deal? We grow garlic every year, right? Well, yes, that is true. Except that this year it nearly didn't happen. This year was nearly a complete bust thanks to election limits on my free time and the Ultimate Digging Machine known as Bandi the adorable mutt.

Damaged Planter Bed
As it turns out  -- the mutt is good at not just digging. Seems she can take apart a planter bed with one swift kick of a back leg. And she managed to do just that some weeks back -- destroying a planter bed that was destined to hold the Bird 2013 garlic crop.

I have always wondered how long these cheaply constructed gardening beds were going to last -- and now I know. Profiled here several years ago, it appears these "gardening beds on a budget" have a lifespan of five to six years. After that? It's time to repair, rebuild or in my case, start from square one.
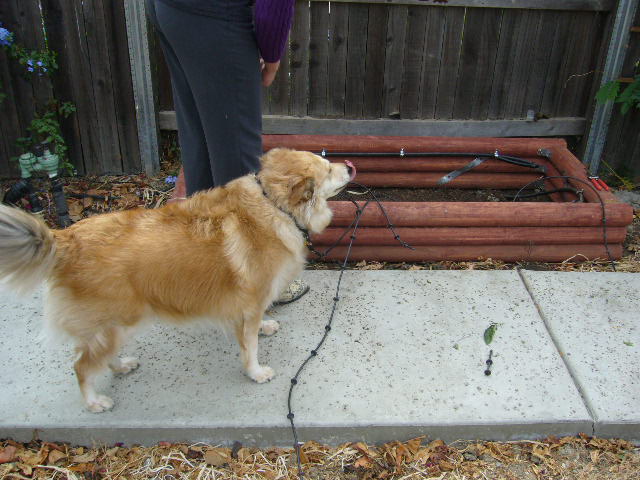
Ultimate Digging Machine at Play
The first hint of trouble came when I spotted fresh dirt on the ground and knew that digging doggy had been up to no darn good. Bandi is clearly past her "puppy stage," but that playful and somewhat destructive side does surface every now and then. That's especially true if she spots a vole (field mouse) duck into one of the beds.

A vole? I must DIG! I must FIND! Do voles taste like BACON? I must find out!

Although the cats that grace the Bird Back 40 get their fair share of "vole treats," these thing reproduce so quickly and in such massive numbers that there's always one or two for Bandi to chase in a futile effort from gardening bed to gardening bed. Keep in mind, she never does catch one. She just leaves her tell-tale sign behind, which is usually a nice little hole in the ground or bed.

Yes Fred, I know. You warned me. You were right.

Gardening Bed Damaged Beyond Repair
When I first noticed that the Ultimate Digging Machine had partially destroyed part of one of my older planter beds, my thoughts first turned to "repair." A few well placed gold screws, I believed, would solve this problem. After all -- the bed had been screwed together once before. It certainly could be repaired in the same fashion, right?

Wrong.

I would come to discover that the Ultimate Digging Machine had finished what Mother Nature started a long time ago. Wood that once those golden screws so securely was now so brittle that it fell apart into tiny pieces at the slightest touch. It was done. It was finished. There would be no repair. There would be no 2013 garlic crop.

Or so I first thought.

Damaged Gardening Bed Logs
But the more I thought about it? I just couldn't let it go. This bed has been the source of so many mouthwatering crops and harvests that I just could not write it off. I grew champion Cherokee Purple tomatoes in this bed! Last summer's crop of green onions and several different types of basil was raided quite often I must say. Lettuce had grown here in the fall. The last harvest had been a fat onion crop.

Let it go? Write it off? Leave a big hole in the ground? Perish the thought. As Oscar Goldman of Six Million Dollar Man fame once intoned: "We Can Rebuild Him." It wouldn't be easy. This was bare, open ground when I built the first bed five years ago. There was nothing to get in the way. The rose bush to the left of the bed was added later. That honeysuckle vine covering up our second beehive was added later. And that nice little sidewalk framing the bed against the fence was added just this spring.

Gardening Bed and Drip Irrigation System Removed
In other words, I didn't have a lot of room to operate. And, to add insult to injury, the old bed would have to be removed piece by piece, along with the drip irrigation system, before I could proceed with new bed building efforts. Removing an old, wooden garden bed is quite the inconvenience to the Black Widow spiders and other creepy-crawlers that had since moved in and long ago called it home.

The first step involved removing numerous layers of gardening soil. It was removed the same way it was added -- with shovel and wheelbarrow. I would come to discover that those golden screws that had held the bed together so securely years ago had since disintegrated and would sometimes just break into two brittle pieces upon removal. Some of these "Lincoln logs" as I call them were so brittle they easily snapped into two or three pieces once they were removed. Years of gardening and usage, plus natural elements of rain, cold and heat can do a lot of damage.

We Can Rebuild Him
Yet -- up and out the old bed came -- piece by piece -- leaving surprised spiders and insects to bolt and scramble away. I was left with a bare spot in the ground and started over with the same system I had employed so many years ago: Assemble the new bed in layers, stack, align, screw and reinforce. The re-installation of the drip irrigation system allowed me to make several improvements that will serve to save precious water supplies, yet ensure that the irrigation reaches every last corner.

By the end of the day? The new bed, which looks a lot like the old bed (minus the black widow spiders), had been installed. Old, tired soil was mixed in with some new planter mix and compost, and what was once old and tired was new again. Venus planted the garlic varieties of Lokalen, Bogatyr and California Late White in short order. The cloves have since sprouted, and everything looks just dandy.

Goodbye Old Bed: Hello Potash!
As for the remains from the old bed? I have quite the growing pile of lumber scraps from previous bed building efforts and other "around-the-house" projects. I wasn't interested in growing the size of that scrap pile, which is why I was happy to have a handy-dandy fire pit installed this previous spring.

Old wood burns fast and hot and leaves behind a helpful gardening supplement: potash or potassium, which is an essential ingredient for any gardening project.

And, as for the Ultimate Digging Machine? She most definitely approves of the new addition. Here's hoping that next "urge" to dig strikes in places where I want to add additional fruit trees next spring.

The Legendary Duke Avocado, Part Deux

Sunday, October 28, 2012

Duke Avocado Trees: Old Oroville Depot
An avocado tree that can not only withstand freezing conditions but laugh in the face of a one Mr. Jack Frost himself? An avocado that offers a higher oil content than the Hass? An avocado variety that can withstand root rot conditions that have doomed other trees in the Bird Back 40? Say it ain't so! I must have one!

Consider this a followup to a journey that started many moons ago during that one night where I could not sleep. I was desperately seeking Susan, err, for an avocado variety that could withstand our colder than cold Northern California winters. It was that night that I discovered the Duke, its ability to withstand freezing winter temperatures and its interesting history, which I wrote about several months ago.

Introductory Garden: Old Oroville Depot
The posting about the Duke has generated the largest response from readers since Venus and I painted a beehive Hello Kitty pink and proceeded to get stung silly while attempting to become amateur beekeepers. That's a good word: Amateur. Another good word is foolhardy. But I digress.

The quest to grow an avocado tree in our micro-climate cold North Natomas Back 40 by reaching back into Northern California history to grab a bit of the past has been an interesting journey indeed. My singular attempt to bring this 100-year old variety called the "Duke" into the present day has now grown to involve the efforts of several growers, some connected with California Rare Fruit Growers (CRFG) and some not.

First Graft Attempt: FAIL!
When I signed off on the last posting, I was attempting to graft Duke scions onto three different avocado root stocks provided by David Johnson, an avocado aficionado who has painstakingly turned his Waterford backyard into a rain forest-like shrine to all things citrus. If you think "you can't grow that here," David is probably growing it, and growing it successfully.

And now? The rest of the story.

I suck at grafting. I really do. It's a skill that I've not yet acquired, despite some early grafting success that I experienced last spring with my pluot and plum trees. Grafting stone fruit scions to other stone fruit trees is MUCH easier than grafting citrus, a painful lesson I would learn after watching every single avocado graft I attempted curl up, turn a none-too-pleasant shade of black and DIE.

After watching my repeated grafting attempts fail and fail and fail again, nearly destroying three avocado root stocks in the process, fate would smile upon me rather fondly. A fellow avocado NUTCASE like me learned of my struggles and advised: "Contact Sam."

GRAFTING: IRANIAN STYLE

Venus Beneath Monster Duke Avocado Trees
"Sam" is actually a nickname for a one Samad Janfeshan, who lives in a quiet Arden Oaks Vista neighborhood. I would later come to find out that Sam is quite famous, provided one of your primary languages is Persian. I am told he still takes phone calls from all areas of Europe and the Middle East thanks to his knowledge and experience in the field of all things horticulture. As I would come to find out, Sam employed a highly successful grafting technique learned while tending the family ranch in Iran.

How did "Sam" get from an orchard in central Iran to Sacramento? That's a story even more interesting than his grafting technique and a backyard that is a shrine to his marvelous grafting abilities. Like many Iranian citizens, Sam was fortunate enough to attend our institutions of higher education in California. Unfortunately for Sam, during this particular period in time, things got a little crazy in his home country.

Ayatollah Khomeini
It was during this time that the Shah would be overthrown, the U.S. embassy would be raided and hundreds taken hostage and a figure known as the Ayatollah would come to power. Overnight, a once-staunch U.S. ally in the Middle East would become decidedly anti-American. Sam, who watched events unfold from the safety of California, decided he wanted no part of the new direction his country was headed in and worked to become a citizen of the United States. He would give up the farm, but never lose his love for fruit trees and other horticultural endeavors.

I am more than fortunate to be steered in this man's direction. He saw the troubles I was having. He scolded me silly for my amateurish grafting attempts and proceeded to teach me a skin-grafting technique that I've never seen performed before. It's a technique that has resulted in multiple plum, mulberry and other fruit tree offerings that grace the family backyard. Yet, you will find none of these varieties at your local nursery. You will, however, find them in Iran.

Duke Avocado Leaves: Brilliant Yellowish Green
It suddenly struck me that if Sam could successfully grow fruit trees native to Iran in the backyard of his Sacramento home, he could probably solve my grafting problems with the Duke Avocado. Call that a rather fair assumption. Every graft Sam attempted survived. Three sorry looking avocado root stocks have been transformed into legendary Duke Avocado trees.

Not satisfied with his success on three trees, additional root stock was procured from a long-time member of the Sacramento Chapter of the CRFG where Sam again demonstrated his successful grafting skills. Additional Duke scion wood was also farmed out to David Johnson and other CRFG growers who are slowly bringing this heirloom avocado tree back to life.

THE BIG TEST

Freshly Harvested Duke Avocados
Although I've uncovered a lot of information about the legendary Duke line and discovered old Duke trees in locations scattered throughout Butte County, one big piece remained missing from this equation. What does a Duke avocado taste like? Was this variety abandoned so long ago because it tasted like the inside of one of my old tennis shoes? I had always strongly suspected that the Duke was abandoned by commercial growers because it was a poor shipper. But I couldn't prove that. Not yet anyway.

I would have to wait for Duke season that finally arrived this month. Duke trees are alternate bearing, which means in some years you get a heavy crop of avocados and other years the pickings are slim. 2012 turned out to be one of those lean years. As I gazed into the treetops of the Duke trees in the Oroville Depot Introductory Garden earlier this month, I found what I was looking for.

Fruit Harvesting Basket for Fat People
It was also 30 feet off the ground. While I was once a champion tree climber in my youth, quite a few years have passed since then, and considerable pounds have been added to my once wiry frame. I wasn't about to scramble up a tree -- avocado or no avocado. Fortunately I had come armed with a fruit harvesting basket like the once you see pictured, plus a handy dandy telescoping handle that put the Duke fruit well within my reach.

I can't begin to describe the joy and satisfaction I felt as I pulled that very first piece of fruit off this heirloom tree and brought it slowly downward. Months of reading, research and phone calls had finally resulted in this moment. Upon grabbing my first Duke avocado, I brought it up close to my ear and gave it a vigorous shake. This was the final test. If this was truly a Duke avocado, the seed would be loose inside the piece of fruit. You can imagine my smile when I heard that tell-tale "thunk-thunk-thunk" sound as the seed bounced around inside.

Loose Seed Pit: Duke Avocado
That tell-tale sign of seed thumping plus the thin green skin confirmed, finally, that this was the Duke Avocado. What was once lost had been found again. After pulling 20-25 avocados from the largest of the two Duke trees in the Oroville Depot, I departed for a nice lunch in the Western Pacific Brewing Company before embarking for home.

I WENT THROUGH ALL THIS TROUBLE FOR THIS?

The first true taste-test of the Duke avocado would take place later that night as I presented the Duke haul to the avocado snob that is the wife that is Venus. The wife that is Venus knows her avocados. The wife that is Venus also has her own avocado TOOL for removing seeds and skins from the precious fruit. I would come to discover that this tool is useless with Duke avocado. It's designed for working with thicker-skinned varieties like the Haas, Mexicola and Fuerte.

Duke Avocado: Right-Hass Avocado: Left
As I watched Venus slice into the first of the Duke fruits, the first wave of doubt washed over me. This wasn't a soft, smooth, creamy avocado. Not hardly. The first taste of the Duke fruit confirmed the worst of my fears. It featured the consistency of a crunchy apple. It was also quite tasteless. What had gone wrong? Had I picked it too early? Was the Duke abandoned because it had the consistency of a rock?

Color me disappoint.

It was a few days later when I received a message from gardening friend Nels Christensen, who I had gifted with four Duke avocados. He messaged me to tell me that he was in the process of making guacamole. "GUACAMOLE!" How does once make guacamole with rock hard avocados? Nels messaged back to inform me that the Dukes had softened to the point to where they were pliable.

Creamy Delicious Duke Avocados
As it turns out, my worst fears were nothing to worry about. Duke fruit does not turn soft and ripen on the tree. Duke avocados are quite hard at harvest. But after picking? They ripen VERY quickly. In two short days my collection of apple-consistency avocados had developed the consistency of a squishy sponge. They were more than ready for consumption.

I began to understand why the Duke had been labeled a "poor shipper." It ripens so fast at harvest, and turns so soft, that it would be incredibly difficult to keep these avocados from spoiling in large numbers. Growers would have been required to move boxes of fruit from field to store bins within a day or less. This effort also would have required consumers to snap up all of the fruit before it could spoil. And as I would come to find out, Duke fruit will spoil quickly once it's been harvested. That window of 48-72 hours isn't much.

THE FINAL PAYOFF

My First Duke Avocado Harvest
So -- what does a Duke avocado taste like after it's been allowed to ripen? A little bit like heaven, my friend. Just a little bit like heaven. Duke avocados are creamy good -- offering a higher oil content than the Haas avocado -- which is the standard bearer in the commercial avocado market. Duke avocados also have a nutty flavor not found in the Hass and other avocados.

The skin of the Duke avocado is another treat not to be missed. Skins found on commercial avocados are much thicker and do, in fact, taste like the inside of one of my tennis shoes. But that's not the case with the Duke skins. They are fabulous and serve as a wonderful addition to consuming a piece of Duke fruit.

The Duke!
Since we had far more avocados than we knew what to do with, or eat in any one setting, Venus creamed many of them, mixed in some lime juice to keep it from spoiling, and stuck the finished product into a freezer. It will make for a nice guacamole snack during the next Super Bowl, when the 49ers destroy whatever AFC Team is foolish enough to take the field against them.

As far as the final reviews of the avocado snobs who tasted this year's fruit? I must admit -- those reviews are mixed. Nels Christensen and his wife prefer the Bacon avocado variety. Count David Johnson as a fan, as he consumed his Duke avocados with the skin still on. And as for the wife that is Venus?

The wife that is Venus is looking forward to the day when she will be able to harvest the first of many Duke avocados from her own backyard tree. And, my friends, that is really all that counts.

Soup's On!

Sunday, October 14, 2012

Fresh Garden Veg-All!
As our summer days begin that ever so slow slide into that cooler interim we call "fall," it's time to take stock of what's left in the summer garden, and what's done. Although some heirloom tomato patches are still churning out fruit, our heirloom plantings pretty much petered out a solid month ago. While we still enjoy the occasional tomato or two, the bushel harvests are a distant memory.

I'm sad to see those days end. I'm never ready for the end of summer gardening season. Although there are things to plant in fall and spring, nothing offers the diversity of produce that springs from a summer garden. What is a gardener to do then, when the sudden urge for an ear of heirloom corn or a single pole bean comes on strong in the dead of winter.

Carrots from the Bird Back 40
My friends, we are prepared!

One of our favorite evening meals, especially during those weeknights after a long day at work, is a simple soup that contains ground turkey, a bit of broth, can of tomatoes and a can of Veg-All. The wife that is Venus stumbled upon this recipe some years ago, and it's been a staple in the Bird Houze ever since. Add in some freshly baked crescent rolls and you've got yourself one quick and easy supper.

This meal is that much better when you can add a can of tomatoes or tomato sauce that came straight from the Bird Back 40 the previous summer. As I took stock of what was left in the summer garden some weeks ago, it suddenly struck me, why purchase the canned vegetable stock known as "Veg-All?" Why not make your own Veg-All at home?

Leaning Towers of Pole Beans
We already know that anything fresh from the backyard is far superior than anything that can be purchased in the local supermarket. So why stop at canning projects that involve tomatoes and cucumbers? Why not put that overproductive carrot patch that would make Bugs Bunny jealous to good use? Our pole bean planting efforts now strongly resemble the Leaning Tower of Pisa. And although this year's corn crop was nothing to write home about, there was still enough there to add to the mix.

Three garden vegetables = Homemade Veg-All.

Fresh Heirloom Garden Corn
One important thing to consider before we move even further into this project is this: This project involves the use of pressure canning equipment. Water bath canners simply do not provide the pressure needed to safely can non-acidic vegetables like this, unless additional acid in the form of vinegar or lemon juice is added. At that point, you wind up with pickled vegetables rather than the canned variety. Even with our pressure canning equipment, Venus and I added a tablespoon of lemon juice to each pint jar before canning, just to play it safe.

Chopped and Ready for Processing
I must say, this has been an excellent year for carrots of all shapes and sizes in the Bird Back 40. The same holds true with the pole bean crop that we planted in July after removing a less than stellar garlic crop. The planter beds that dot the Bird Back 40 don't stay empty for very long. Once one crop is removed, the tired soil is amended and new seeds are added for the next crop.

But, I digress.

Parboil and Can
This is a much simpler project than canning tomato sauce, whole tomatoes and salsa. Those canning efforts involve a number of different steps before the actual product is added to jars and placed inside canning equipment for processing. For a simple vegetable mix like this? It's pick, clean, chop, mix together, parboil and can. The only difference is processing time -- about 45 minutes at 15 lbs. pressure. Just the simple act of processing can take several hours, especially if you have more jars of product than canning space in the pressure canning equipment.

But the payoff is a sweet treat during those cold winter months. If popping open a jar of home-canned tomatoes or tomato-sauce brings that sweet smell of summer into the kitchen, I can only begin to imagine the smells and taste that our vegetable canning efforts will bring.

SIMPLE WINTER SOUP

1 lb. ground turkey
1 tablespoon oil
1 onion
4-5 cloves peeled garlic
1 14.5 ounce can beef broth (water and beef bullion works just as well)
1 14 ounce can whole or chopped tomatoes
1 can Veg-All
Fresh or dry herbs

Fresh Garden Veg-All
Use food processor to ground garlic into bits and cut onion into appropriate bite-sized pieces. If you don't have a food processor, use a blender, or put a butcher knife to good use and start chopping. Add onion, garlic and ground turkey to soup pot containing oil, and proceed to cook on medium high heat until meat is cooked and no longer pink.

Add beef broth, tomatoes, Veg-All and herbs of your choice (Venus uses a mix of basil, oregano, cilantro, marjoram, whatever she has handy) and bring to a boil. Simmer for 20 minutes. Remove from heat, or just turn the stove off and allow soup to cool slightly before serving. Pop some crescent rolls or any other role into the oven for ten minutes and serve with soup.

Enjoy!

The Crenshaw Surprise

Sunday, September 16, 2012

Vine Ripened Crenshaw Melon
On the first weekend of the 2012 NFL Season, the garden in the Bird Back 40 delivered a sweet treat in the form of a Crenshaw melon. Here on the second weekend on the 2012 NFL Season, the garden is about to deliver five more.

Fresh off watching the San Francisco Giants pull even closer to a National League West title and my suddenly reborn Fresno State Bulldog football team deliver and eye-popping rout of the Colorado Buffaloes, I can tell you that life is pretty sweet at the moment. It's almost as sweet as the Crenshaw melons that are coming off the Bird Back 40 vines in eye-popping numbers.

A Sweet Surprise Awaits
I've never grown this melon before. Shame on Bill Bird. Because this melon has now found a permanent home in our North Natomas soil. Short and sweet? The Crenshaw melon loves the Bird Back 40. So, we'll love it back.

The melon pictured above and to your immediate left is the payoff for watching this treat turn from a bright green to a dull yellow. The rind of this melon also tends to die back near the blossom end, which makes it an inviting target for birds and bugs. I watched -- anxiously -- as this treat started to ripen, hoping and praying that the Birds would get to this treat before the mockingbirds that frolic and sometimes curse our backyard.

Crenshaw Melon Chunks
Consider this prayers answered. The melon slowly ripened until it told us it was finally ready last Sunday morning. I was rather curious. Our first experience with this melon was rather disappointing. I had picked the first one a smidge too early. Although it was pleasantly sweet, it was nothing like the sweet tastebud surprise we were about to receive.

That taste and wonderful texture grabbed my attention fairly quickly. What exactly is a Crenshaw melon and why I have I waited so long to plant said variety? From our friends at wiseGEEK:

Crenshaw Melons on the Vine
"Crenshaw melons were bred by crossing casaba melons with Persian melons, also sometimes called muskmelons. The favorable traits of both melon varieties successfully manifested in the cross breed, and it quickly became one of the more popular melons on the market. The melons can be eaten plain as a snack food, mixed in with fruit salads, or wrapped in prosciutto for a twist on the classic prosciutto wrapped melon appetizer."

I'll admit, it's been a strange melon season in the Bird Back 40. August is normally the strongest month for melon production, and while we've pulled our share of cantaloupes and small watermelons from the vine, August production hasn't been anything to really write home to mom about.

Georgia Rattlesnake Watermelon
But September? September is a decidedly different story. Those Georgia Rattlesnake watermelon vines are suddenly popping with late season production. While the cantaloupe and Sangria watermelons have largely played themselves out, the Crenshaw vines are putting on a real show with production I've never witnessed in a backyard melon patch before.

The big question mark is, will the weather hold? Melons like long, hot summer days. They don't dig cool fall temperatures. Mother Nature has done her part by delivering a mid-September heatwave, but the days are getting shorter. That can play havoc with melon vines and varieties that need 60-80 days to deliver a firm, vine-ripened melon.

The Crenshaw: Sliced and Ready to Chunk!
I don't have any doubts about the Crenshaw melons that are now just starting to turn yellow. But that Georgia Rattlesnake? Why did you take so long to show up? Thank you for coming, but please, hurry up! This weather isn't going to last forever!

There is no better weekend treat than a sliced Crenshaw melon. Starting your day with a bowl of fruit procured from your own backyard vines is the final payoff for a summer of vine-tending work. And, after one bite of a vine-ripened Crenshaw melon, a gardener comes to realize that it was worth the effort and that much more.

Baby Got Beet

Saturday, September 15, 2012

Beet on Steroids?
With all due apologies and respect to Sir-Mix-A-Lot, "Oh my God Becky, look at her BEET. It is SO big!"

That is, indeed, one very big beet. And since it was grown personally by the wife that is Venus -- I do feel safe in saying "Baby Got Beet."

When Venus pulled this out of one of our raised beds a couple of nights ago and literally needed the services of a wheelbarrow to get this monster inside -- my original thought was the following: "she planted beet seeds far too close to one another and they sort of all glaumed (is that a word?) on together."

Not an invader from another world: Just a beet
Hey, if "glaumed" is good enough for the incomparable Henry Wadsworth Longfellow -- it's good enough for the blog that is Sacramento Vegetable Gardening. But, I digress.

This much is true: The wife does have a well documented green thumb. This much is also true: She doesn't pull basketball sized beets from the garden every other day of the week. Yes, we do get the occasional baseball sized radish. But that's kind of rare.

As is this monster of a beet.

Speaking of which -- what does one do with a beet the size of a basketball? Set up a hoop and net? Use it as a bowling ball? Welcome to the Bird House! Coffee? Tea? A gallon of Borscht?

Bigger than your ordinary water bottle
That was -- after all -- the second question to Venus. This is after I came home and nearly tripped over the thing. At that point came the second question, which went sort of like this in a calm and relaxed way: "HOLY COW!!! WHAT ARE YOU GOING TO DO WITH THIS???"

I suddenly had visions of going on a diet consisting solely of beets. Not that beets are bad, mind you. Bill Bird loves beets in a salad or other setting with other vegetables. But Bill Bird does not bathe with beets. Bill Bird does not dream of bathing with beets.

Side note? Beets have been around for a very long time. The earliest recorded history has them popping up in Babylonia in the 8th Century BC. Although ancient Romans considered beets to be an aphrodisiac, that really isn't such a big deal since Romans considered just about everything to be an aphrodisiac.

Creature from the Black Magoon
So what does one do with a monster like this? One can't just cannot tear into a beet freshly harvested from a raised backyard bed. It's not like a peach that is freshly harvested from a backyard tree. These things need processing. More precisely, they need to be boiled for a good hour or three before they are tender enough to slice and serve as -- well -- beets.

Have you ever tried boiling a bowling ball? I haven't either. But I can tell you this much. It ain't all that easy. But the wife would not be deterred. If she grew a beet the size of Third World Country, she was going to make sure that ever last bit of said Third World Country didn't go to waste.

Monster Beet After Processing
Grabbing the largest pot in the pantry -- a pot normally reserved for processing other crops like tomatoes and turning them into pints of good things like sauce and salsa -- Venus dropped in the beet monster -- filled it with water and started the process of turning bowling ball into something consumable.

Darn if that lady didn't know what she was doing!

A myriad of thoughts ran through my mind during this process. Would said monster ever get soft enough to process? Would it have the fine taste of "wood grain" after processing? Beets don't often get this large, and these were safe questions to ask.

Hey! That Doesn't Look Half Bad!
But something rather amazing happened when Venus removed her prize beet from the Bird processing pot after three hours of boiling. It sliced open. Not only that -- it sliced open easily. Inside? A deep and pretty shade of mahogany revealed itself. There was no wood here. It sliced the way a beet should slice.

But how would it taste? I was still rather skeptical! Would this be a woody waste of time? Imagine my surprise at the first bite. A blast of sugary sweetness greeted Bill Bird's taste buds. This wasn't just any ordinary beet! It's the best beet that Bill Bird has ever tasted!

My mind immediately turned to the empty pint jars in the pantry. We have processed beets before -- on many occasions. There's nothing more enjoyable than tearing into a jar of sliced beets that you processed the summer before on a cold, dark winter eve. Home processed beets are not as sweet as the commercial counterparts sold in grocery stores. They are also far more tasty.

Sliced Beets for the Masses
But the wife had other plans. Process her prized beet? Away with you husband! One doesn't process a golden garden surprise like this. It is to be consumed over the process of several meals. Try as you might, the taste of fresh garden beets is hard to duplicate. As a matter of fact, I still have the taste of this special beet in my mouth, even though said beet is long gone at this point.

It's the kind of taste that makes you wish you had just a little bit more. Baby Got Beet? Sir-Mix-A-Lot would most definitely approve of this message.

The Relic

Saturday, September 1, 2012

Plain Old Tomato Paste (YAWN)
The item pictured to your immediate right no longer serves any useful purpose. It is covered with dust. It sits in a kitchen cupboard accomplishing nothing at all other than blocking our path from other useful food items. It is as useful as that old television set gathering dust in your garage. If this was the "Utlimate Computer" episode from original Star Trek series fame, the name of this can would be "Captain Dunsel."

It short, it is the "most uninteresting can in the world."

So why keep it around then? That's a good question! Perhaps it serves as a reminder of a different time in our lives.  Perhaps we might need this in a pinch one day in the near future, however I doubt that very much. It has as much use now as that old jar of Herdez brand salsa, which has since been washed out and now contains syrup for pancakes (recycling! It works!).

Recent Garden Harvest-Salsa Anyone?
This is the State of Bird -- 2012. Venus and I haven't purchased a jar of anything containing a tomato product in God-knows-how-long. Purchases of tomato sauce, tomato paste, whole tomatoes, cut up tomatoes, tomatoes with herbs, tomatoes-infused-with-garlic, hot salsa, medium salsa, etc. haven't been on a Bird shopping list for years. This is what it means to garden. Call us snobs, and perhaps we are, but why buy any of these things when we can create an even better product and bottle it up at home?

Snobs we are. Because that's what we do. And, perhaps, it might be the reason why I haven't been blogging much as of late. August means harvest season in the Bird Back 40 -- and what a whopper of a harvest it's been. Although it's petered off somewhat, the garden will continue to produce as long as weather permits. And if the good Lord gives us the kind of weather that pays off in another 15 pint jars of lip smacking Roasted Garlic, Pepper and Heirloom Tomato Salsa, Herb-infused tomato sauce or additional quarts of whole heirloom tomatoes -- I won't complain.

Herbed Picante Tomato Sauce
Our latest project containing garden grown goodies is pictured upper left. Harvests like these were the norm during the months of July and August. And with each and every harvest of peppers, tomatoes, herbs, etc -- a tasty canning project awaited. Would it be fresh cut up tomatoes with herbs and peppers? Pickled peppers perhaps? Sliced and pickled Mucho Nacho Jalapeno peppers? It really depended upon what the garden gave us on that particular harvest day.

If there's one other hard lesson I've learned about home-canning efforts, it's this. One does not make an appointment with the garden to tackle a canning project. The garden doesn't make an appointment with you, either (next Sunday good with you? OK!). The vegetable garden tells you when it's ready. Best be prepared. Miss a day? Miss a lot. When the garden is ready, you're ready. Those fifty ripe tomatoes aren't going to sit around and wait for you forever and a day.

Whole Tomato Canning Project-Summer 2012
Although we're far short from calling ourselves master canners -- or master anything for that matter -- we've done this enough times to know exactly what kind of tools we'll need and what kind of jobs must be accomplished. Putting together a home-canned salsa -- for example -- is far more difficult than a project of whole tomatoes. A simple batch of Roasted Garlic, Pepper and Heirloom Tomato Salsa is far from simple, and requires multiple steps from roasting to peeling to chopping to processing.

Exact measurements are an absolute must for projects like these. If you're not following time-tested canning recipes to the letter, or pushing the envelope a bit, you're risking a trip to your local hospital and a stomach-pump procedure. Although a procedure like this has never been performed on yours truly, it doesn't exactly sound like a fun way to spend a Saturday night!

A Caitlin Contreras Original
Naming rights also come into play when you're tackling a project like this. Who wants to give a home-canned project a name like "tomato sauce" or just plain ol' "salsa." Why confine yourself to terms like "medium" and "hot" on the spicy scale? Why not "volcanic" instead? Or -- hold a Facebook naming contest as we recently did for our last batch of salsa. Although Dan Vierra (former Sacramento Bee garden editor and writer) was on his game with suggestions like "Cremation Mix," it was Caitlin Contreras who knocked it out of the park with her suggestion of "Almost-As-Hot-As-Venus."

The wife that is Venus approved. Caitlin's double-entendre name selection also earned her a free jar of salsa.

The payoff for all this hard work comes in the dead of winter. Grocery stores are selling rocks disguised as red tomatoes for $3 lb. or more.  Although you can pick up two or three cans of off-brand sauce for a buck, there's nothing quite like the feeling or SMELL of opening a jar of heirloom tomatoes that you processed the previous summer. That fresh-from-the-vine harvest smell and experience wafts up and encompasses an entire kitchen.

Summer's Bounty: Heirloom Tomatoes
That, my friends, is the payoff. This is what makes all that hard work worth it and more. Dinner that night will be reminder of those carefree warm summer days.

Snobbery has its rewards.

Did someone say recipes? You can find the recipe for our original Roasted Garlic, Pepper and Heirloom Tomato Salsa here. Another favorite is posted below. All have been tested and are "canning safe."

Herbed Picante Tomato Sauce
(a Sharon Howard original recipe)

NOTE: Food processor or blender required...You will also need canning equipment like this.

24 cups smooshed tomatoes whirred smoothish
4 cups chopped herbs of your choice
1 cup finely chopped jalapeno peppers (including seeds)
12 TBSP bottled lemon juice
2 TBSP coarse salt.


I use basil, oregano and parsley but you can use only one or two or three and you don't need to use equal amounts, in other words you can go 2/3 basil 1/3 parsley just DON’T increase the amount of herbs or peppers. Bill and Venus use whatever herbs they have in large amounts from the herb garden. This includes basil, oregano, sage, majoram, spicy oregano, thyme, etc.

Directions:

Fresh Garden Herbs
Add all items together and bring to a rolling boil. Lower heat to a high simmer, you want to see some action but not a full boil. After coming to the boil a foam will form, skim it off.

Place your one-pint canning jars in the dishwasher, when the jars are done so is the sauce. I generally cook about an hour, you can go longer. I don't like to cook less than an hour 'cause I want some thickening to take place while canning so it doesn't need to much cook time when I use it.

Place canning lids into a pot of hot water after washing. Bring to a simmer, but not a full boil.

Fill jars as normal. Wipe tops of jars to ensure a tight seal. Seal to finger tight with lids and rings. Hot Water Bath for 45 minutes. Or pressure can at 15 lbs. for 25 minutes.